Everything You Need to Know to Start A Spiritual Blog Off Right!
In this post, you’re going to learn everything you need to know to start your own spiritual blog!
I absolutely love being a spiritual blogger. It’s been over 8 years since I first started Ask-Angels.com and this journey of spiritual blogging has played such a key role in helping me to experience greater levels of purpose in my life.
I’ve also been able to connect with and serve tens of millions of readers and have created a full-time income through spiritual blogging.
How to Start a Spiritual Blog
This post will walk you through everything you need to know to start a spiritual blog! This includes the more technical side of spiritual blogging, with a step-by-step guide to starting your spiritual blog including what platform to choose, how to set it all up and more!
Over the years I have made many mistakes with my blog and have found a few things that work really well. My goal here is to share with you what works well, so you can avoid the challenges I faced figuring this all out on my own.
I am happy to share everything I’ve learned with you with simple “step by step” instructions now!
What You Will Learn In This “How to Start A Spiritual Blog Post”
Who Can Become A Spiritual Blogger?
Get Clear! Why Are You Starting A Spiritual Blog?
Setting Up Your Blogging Platform
Everything You Need to Know About Hosting
Doman Name – Do's and Dont's
Step-by-Step Guide to Setup Your Hosting and Blogging Platform
Themes – Everything You Need to Know
Creating Content On Your Spiritual Blog
How to Write A Good Spiritual Blog Post
A Little Trick For Editing Your Writing
The Low Down on Pictures and Images
Share The Love
The Pure Magic of Plugins
Don't Forget to Update!
Using Widgets to Manage Your Sidebar and Footer
Start Making Money With Your Spiritual Blog
The “Keys” to the Spiritual Blogging “Kingdom”

Who Can Become a Spiritual Blogger?
When it comes to starting a Spiritual Blog, there are really no pre-requisites, certificates, or anything else that's required. There's no gatekeeper, publisher, or editor you need to get permission from to start.
If you have the desire to start a spiritual blog. You can become a spiritual blogger!
Whether you’re a holistic practitioner, an aspiring author, an angel card reader, psychic intuitive, massage therapist, new age shop owner, or are involved in any other metaphysical, wellness based products or services, you can benefit immensely from consistently publishing to a blog you own.
Honestly, you don't even need to be an expert yet, and there are many great blogs out there that simply research, and curate content from experts. So don't let the limiting belief of “I'm not enough” or “I don't know enough yet” hold you back.
One thing I do want to make clear… If you're going to curate, don't just plagerize and say the articles and work of others is your own! Site your sources, and highlight the authors who you're curating if you're going this route.
One of the main reasons spiritual blogging is so beneficial is that when people have questions, especially about anything related to wellness, spirituality or psychic awakening, they turn to Google to ‘ask’ their questions.
Whether this is a search phrase like:
“Best massage therapist near me”
“Am I psychic?”
“Where can I get an accurate angel card reading?”
Or “What does it mean when I keep finding feathers” …
People are searching Google for their answers!
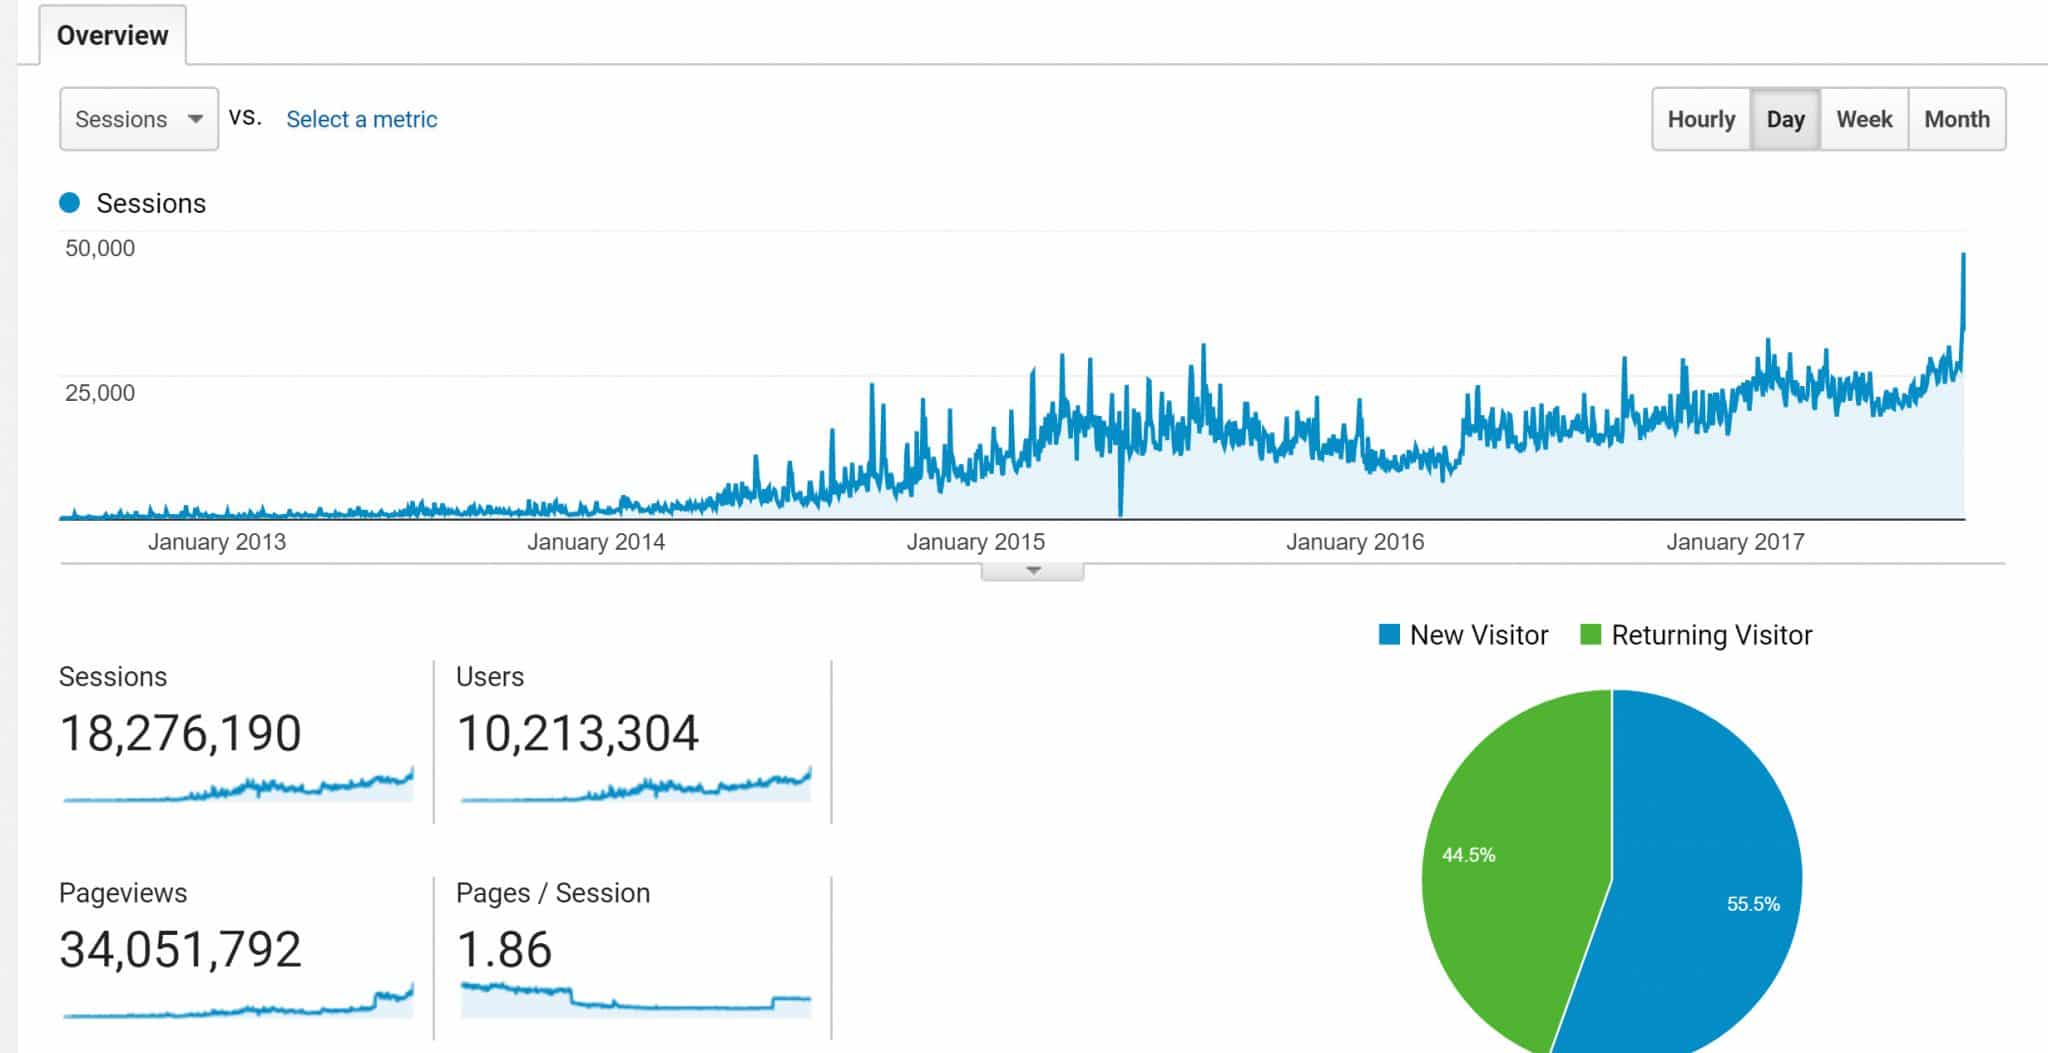
If your blog answers the questions people are typing into google with high quality, relevant answers to their questions through your blog, you have the potential of being displayed in the Google search results.
This is how you can receive highly targeted visitors from Google (as shown from my blog below)!

Get Clear! Why Are You Starting A Blog?
The first and possibly most important question for you to ask yourself is “What’s my goal with starting a blog?”
Having a clear focus about why you want to blog, who you can serve, what you want to write about, and what passions want to share through your blog is key.
There is absolutely an opportunity to make money as a spiritual blogger, but your intention for blogging needs to be much bigger than just making money for your blog to really work!
Blogging is a great way to connect with people, and your readers will be able to sense your passion and excitement (or lack thereof) when reading your posts… If your articles and blog posts are not filled with this passion, readers will not frequent your blog and the search engines won’t likely deliver you, new readers.
Second, building a successful spiritual blog is challenging. From the technical side to the fact that successful bloggers need to publish new content every week, there is a large amount of energy required…
If you are not passionate about the topics you are blogging about, you won’t have the energy or motivation to persevere, which is required for your success.
I can and will lay out the blueprint for you here, but it is up to you to take consistent action to build your successful spiritual blog.

Setting Up Your Blogging Platform
There are many options for blogging today. Several companies offer ‘simple’ platforms that create clean looking websites which allow you to start your blog fast.
These companies all have two major flaws that can severely limit your potential to reach new audiences and they will leave you trapped on a subpar service unable to integrate the tools, plugins, and add-ons needed to run a truly successful spiritual blog.
The blogging platform you choose is like the foundation for your online home. Although it is not ‘seen’ by your readers, it makes all the difference in the world for your long term blog success.
If you build your home on the wrong foundation, the foundation can crumble, bringing down your whole house.
If you build your home on a weak foundation, you won’t be able to build the home in such a way that gives you the ability to add on rooms or entire levels in the future.
Even worse, some of these ‘simple’ platforms have simply shut down over the years literally turning off their clients’ blogs after years of publishing… I can’t even imagine how terrible that would feel to have years of writing efforts deleted and destroyed.
The solution here is to choose a stable foundation that you control and that offers you the maximum opportunity for growth over time…
In other words, you need a self-hosted WordPress blog.
WordPress is the platform I’ve used from the start, and is honestly the only solution worth considering…
What Is WordPress?
First off, what is WordPress?
WordPress is a content management system that started as a blogging platform and it is 100% open source.
Open source simply means that there are thousands of really smart people around the world who volunteer their time and coding skills to continue to update WordPress, add security patches when needed and build in new functionality.
The best part? WordPress is 100% free.
To give you an idea of how popular WordPress is…. About 30% of all websites online are running on the WordPress platform, including Ask-Angels.com, and my membership website, too!

Everything You Need to Know About Hosting
When it comes to hosting, I recommend “self-hosting” your site. Self-hosted means that your WordPress site runs on your own web server that you have 100% control over. As mentioned, above, I highly recommend this option.
By having your own hosting, this means that no one can ever shut your site down, or limit the functionality you can add on to your site in the future.
But self-hosting… Is that complicated?
Luckily, today self-hosting is not complicated at all… There are entire companies dedicated to managing your server for you… The company I recommend for hosting will also install WordPress for you and it only costs a couple of dollars per month!
Now, not all hosting companies are created equally and I recommend you start with A2 hosting for two main reasons.
#1 – A2 Hosting is independently owned and offers AMAZING support.
When you try to reach out to the big hosting corporations that are aggressively advertised and have millions of customers, you will often find that the support staff is not very helpful and they often have a ‘pass the buck’ mentality.
I have run my sites on (and moved to) over 6 hosting companies over the years…
Take it from me, moving your site is a major pain in the neck, so getting on the right host from the start is important. I’ll show you step by step how to do this in just a minute.
#2 – A2 Hosting is incredibly inexpensive!
The second reason I recommend A2 hosting, is that you can host your blog on their shared WordPress server which allows you to share the server fees with other website owners. This means you can run your website for under $5 per month!
Now that you understand why a self-hosted WordPress site is the only solution for your spiritual blog, let’s get started!

Domain Name – Do's and Dont's
Your domain name is the address on the web where people can find you. Your domain name will also be the name of your blog, and your brand name too.
For example, my domain name is Ask-Angles.com
A domain name should be easy to remember, simple to spell, should spell just like it sounds and end in a .com if possible.
The first choice many people have when it comes to their domain name is to use their personal name or a brand name.
For me, I had the option to use MelanieBeckler.com, but I wanted the website and the content to remain focused on the Angels and the Angel Messages I channeled… So, I chose my domain name to be a brand name instead of my personal name.
However, if you are an author, speaker, industry expert or a well-known practitioner, choosing to use your name as your domain name can be a great option.
If you do choose to create a brand name for your site, you will need to find a name that is currently available, since many domain names are already taken.
I’ll show you how to search for a domain name if you need one in the next step…
If you already own the domain name you want to use, know that you can ‘point’ it to your hosting and I’ll show you how to do that in the next step too.
Choosing a domain name for your spiritual blog is a very personal experience and can take time to find the right name that is currently available.
Be patient with yourself in this process and remember to keep it simple! If you get too clever or start using misspelled words or words that are difficult to spell… Your future audience may not remember how to find your site when they want to return!

Setting Up Your Website Hosting & WordPress
Once you have your domain name chosen, you can move on to the website hosting and get WordPress installed.
While many website hosting companies leave you to ‘install’ WordPress yourself, A2 Hosting will do this step for you (another reason I recommend them).
With A2 hosting, when you purchase hosting from them, they actually install and setup your WordPress blog for you at no additional charge.
But before we get into that, I want to be sure you understand what web hosting is and why it is necessary.
What Is Web Hosting?
A simple analogy is to think of your web hosting as the virtual real estate that your blog lives on.
You lease space from the hosting company on one of their web servers which are professionally managed and maintained so your site can stay live online 24 hours per day, 365 days per year.
Your domain name points to your server so that when someone types in your domain and presses enter, your site is displayed in their browser from the web host.
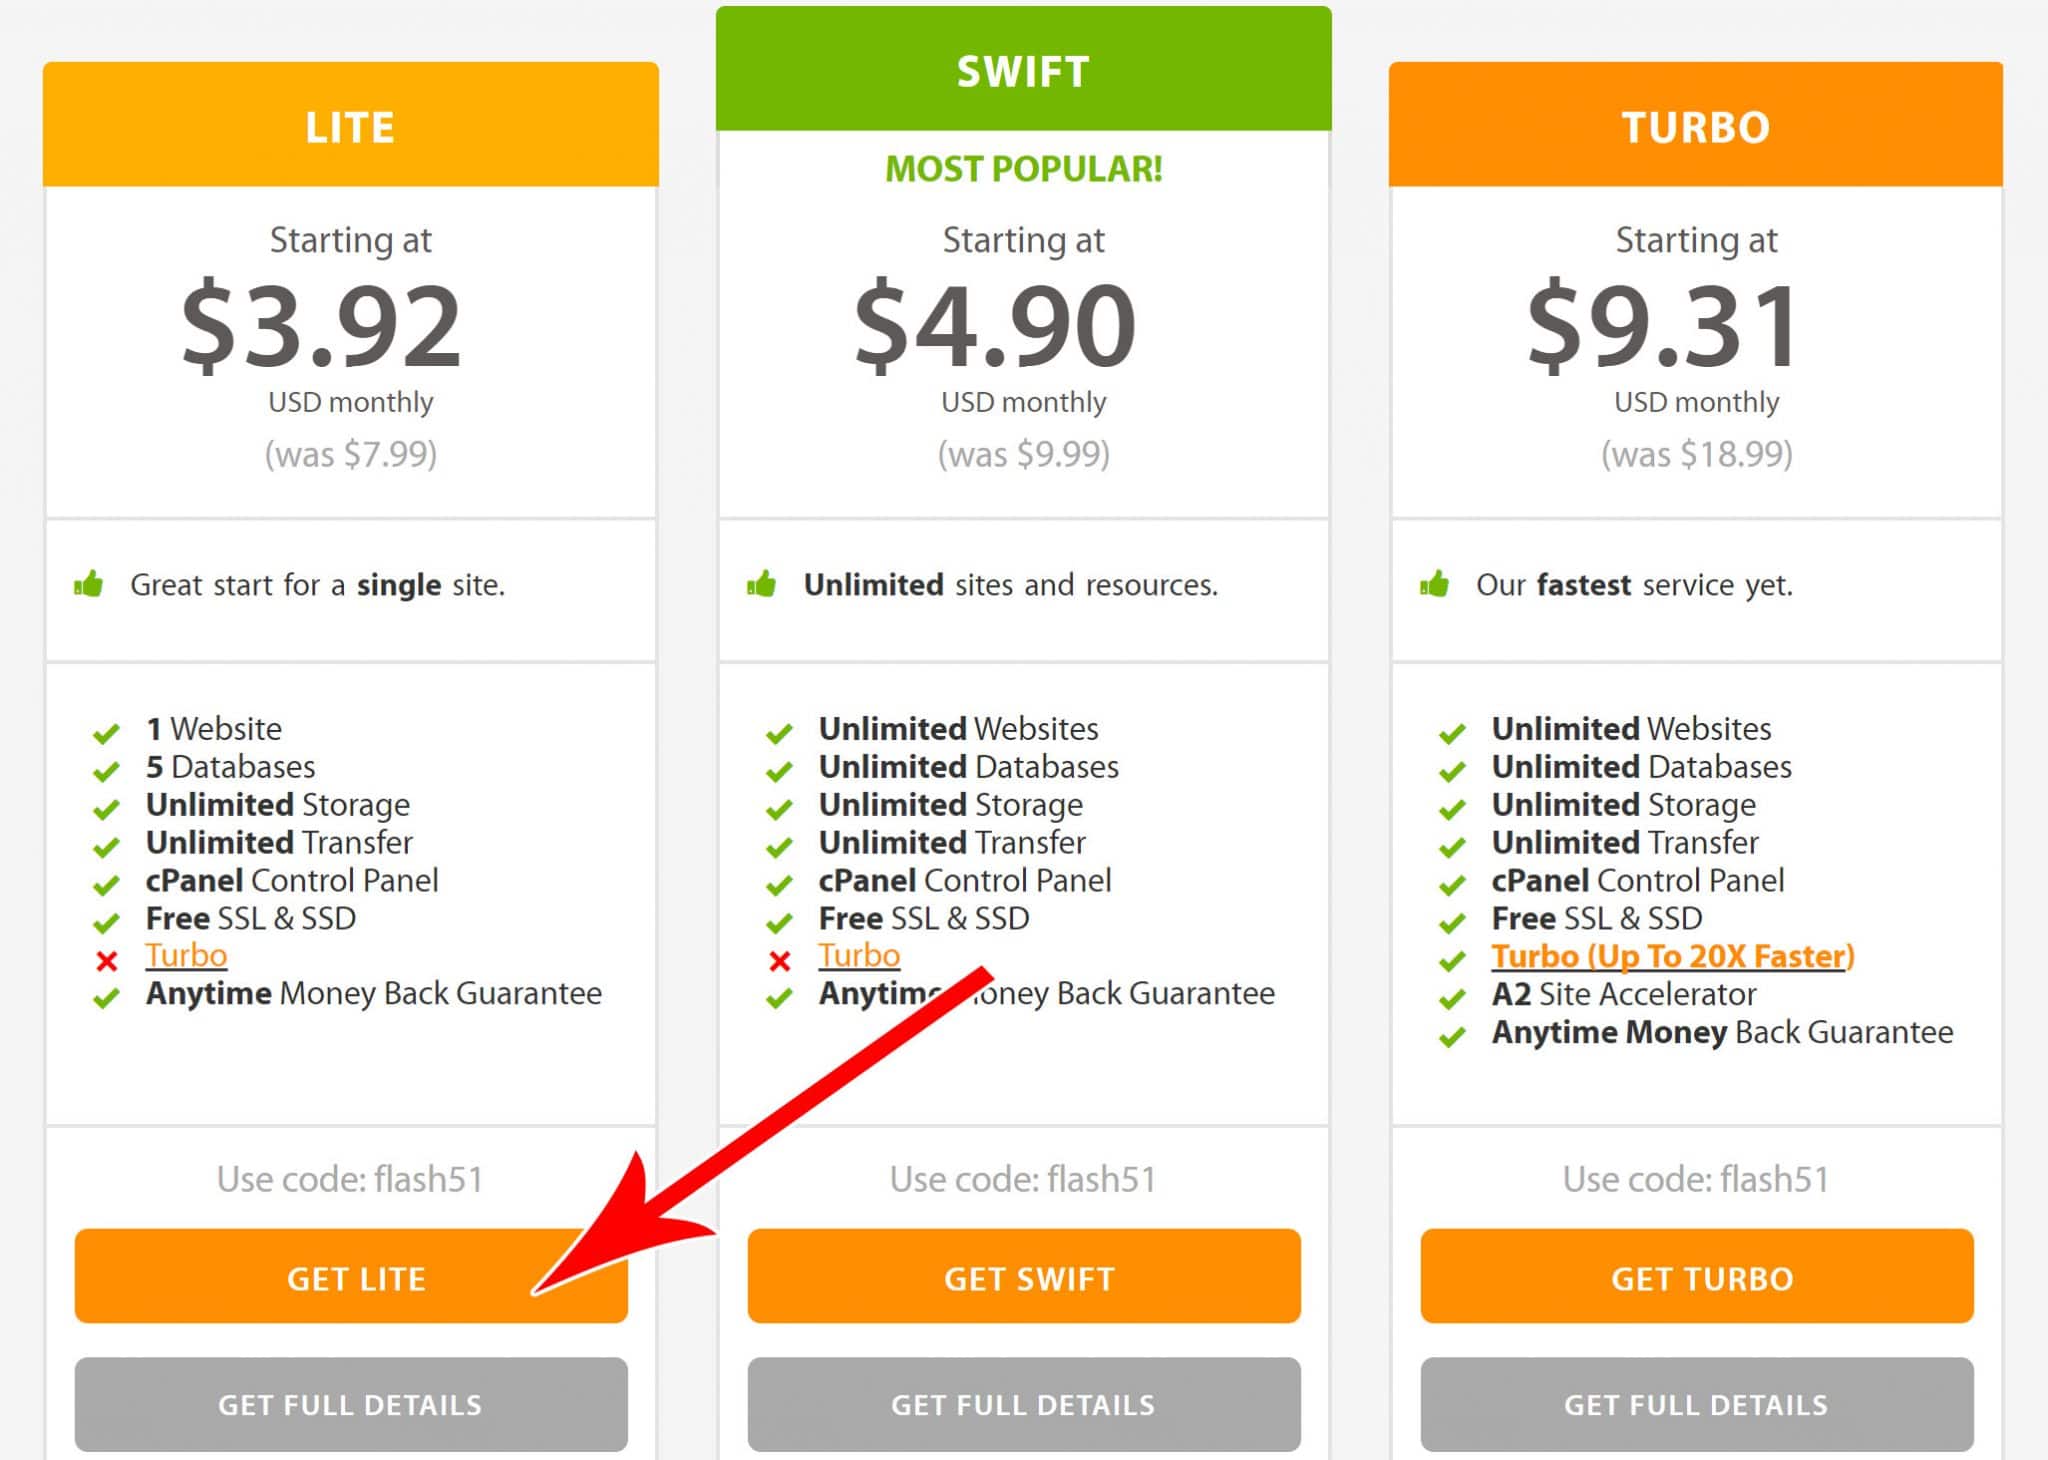
To get started, simply click here and choose the “Lite” Hosting Package which costs under $4 per month when you purchase for 2 years at once.
Click on the “GET LITE” button as shown above and you will be taken to next step, which is choosing your domain name.
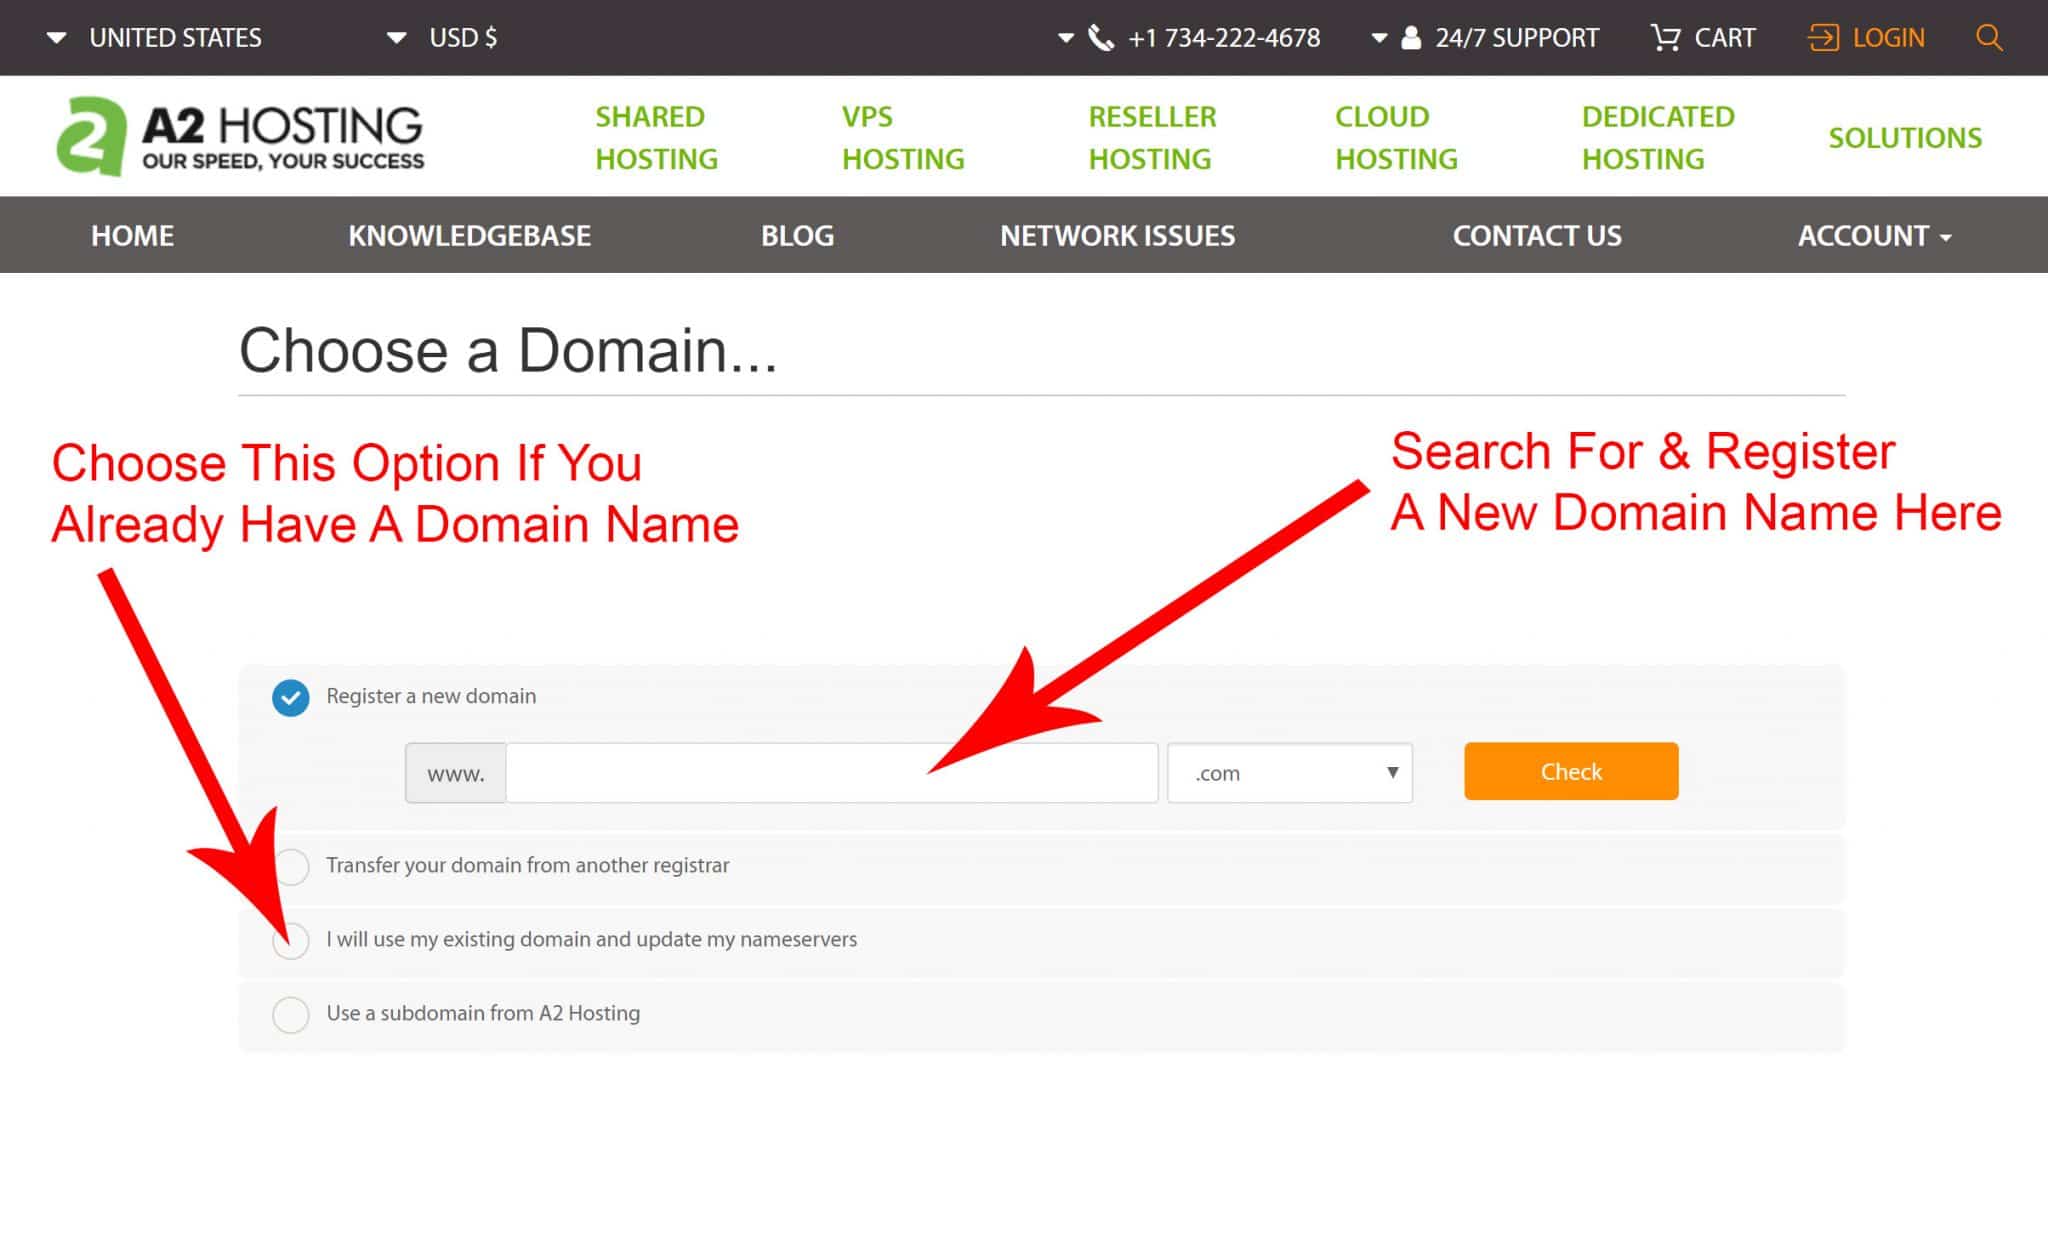
If you already have your domain name registered somewhere else, simply choose the “I will use my existing domain and update my nameservers” option.
If you are registering a new domain name or you need to search for the domain options that are available, enter the domain name you would like to register into the space provided (as shown below).
On the checkout page, A2 Hosting will offer you additional services like the ‘turbo’ package to speed up your site even more, or SSL which allows your site to display as ‘secure’ in users browsers.
Although these are beneficial, they are not necessary for you to get started if you want to keep things as budget possible getting started… You can add them on at any time in the future when you’re ready!
If your budget allows for SSL and Turbo speed, I do recommend them, but if your budget does not allow for them now… Add them on later.
The one add-on I really recommend from the start is the identity privacy option when registering a new domain name.
This will keep your name and contact information (like phone number and address) out of the public record so you will not receive any unsolicited marketing messages or junk mail.
I do this on every domain name I register and highly recommend you do too.
You will enter your check out information next and at the bottom, notice the area in the yellow box.
This contains your username and password that you will need to log in to your WordPress website for the first time after they install it for you.
Copy this information down on your computer and save it so you can get access to your blog once it is setup with A2 Hosting.
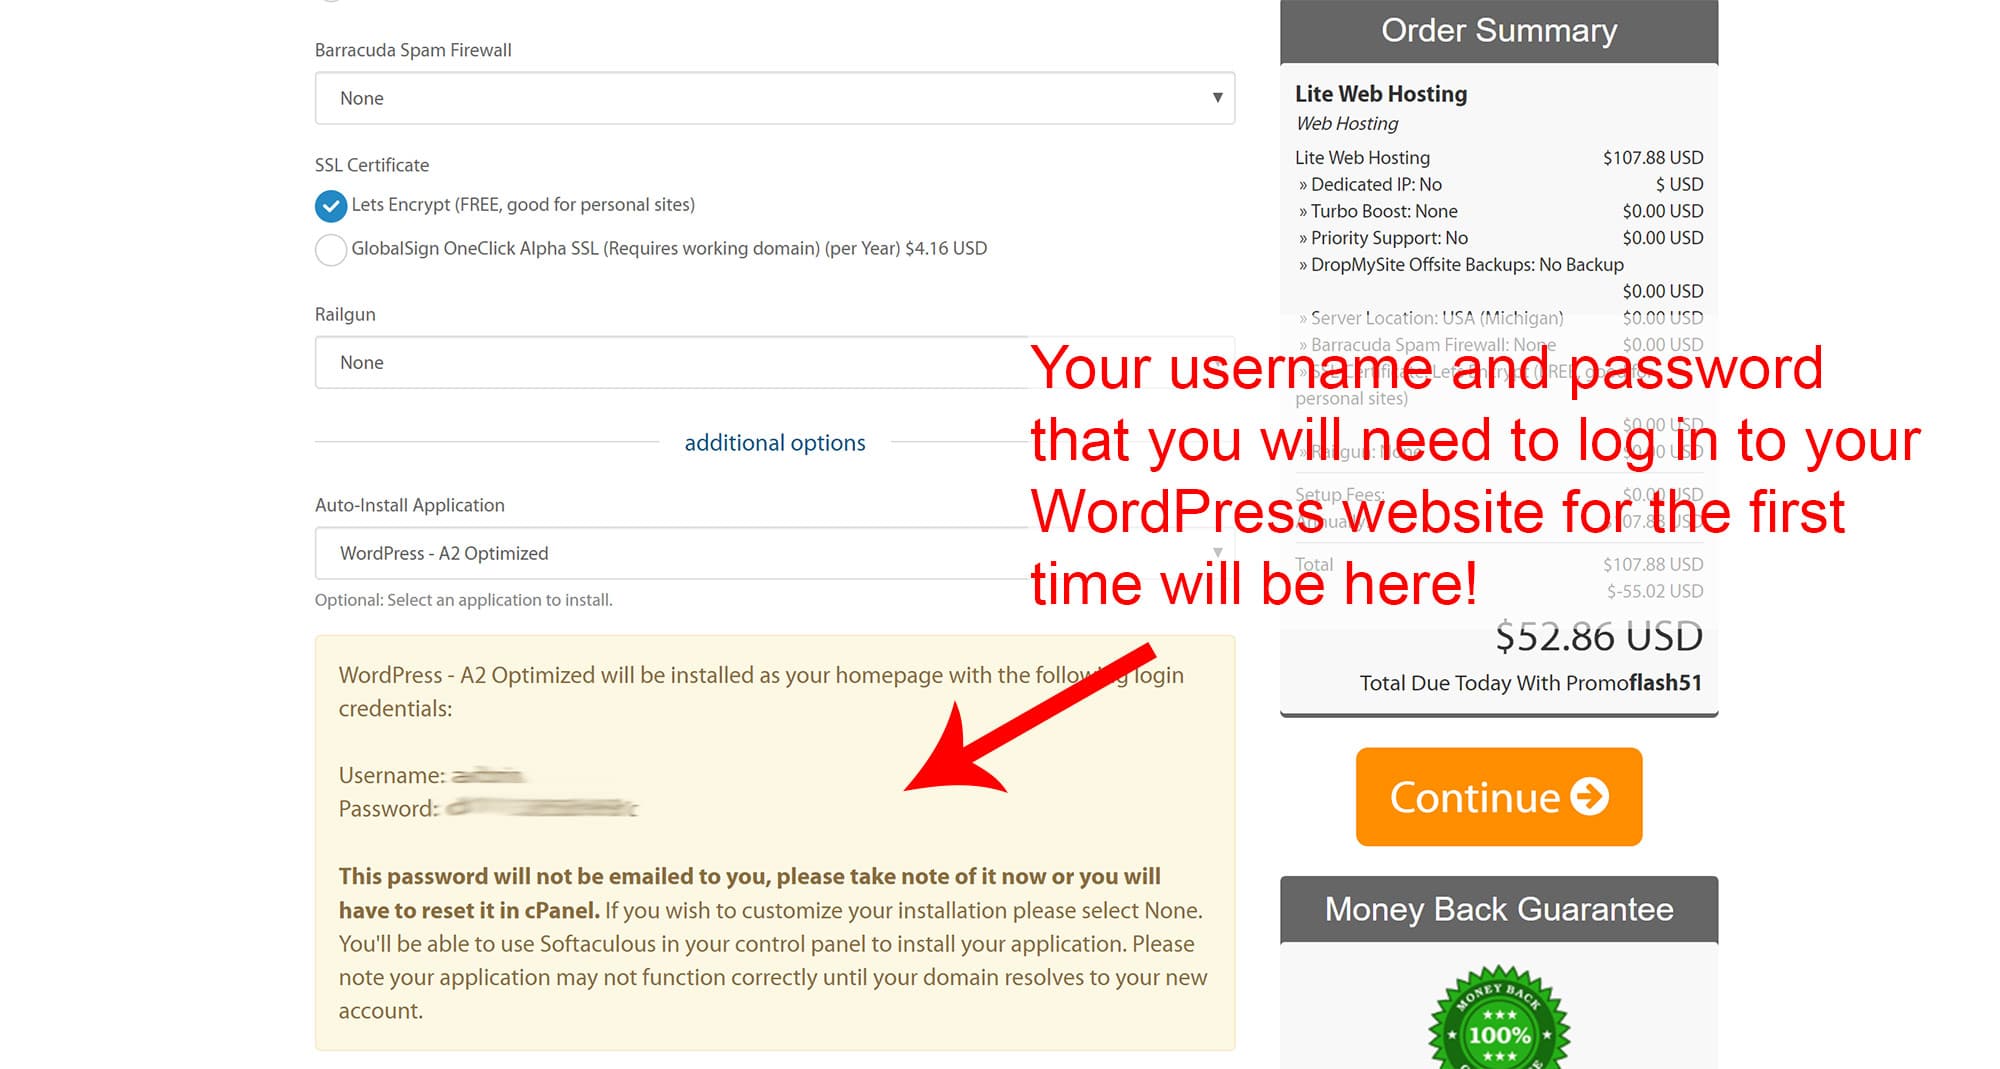
Complete the checkout process by pressing Continue, and once you submit your order, be patient.
Since they are installing and configuring WordPress for you, it can take 5 – 10 minutes for everything to get setup after checking out… So be patient!
Leave the checkout page open, and consider taking a quick walk, listening to a meditation, or making yourself a cup of tea at this point.
You have taken a powerful step forward towards setting up your spiritual blog and sharing your gifts, your messages and your ideas with the world!
After several minutes (it can take as many as 10 – 15 minutes), you will receive a series of emails from the A2 hosting team.
I'm going to walk you though these now…

#2 – Welcome! – This email contains all of your server information including access to your hosting Cpanel, access to your webmail, how to connect via FTP and more. Now you will not need this information right now, but you may at some point (if you ever hire a developer, for example) in the future, so I recommend copying all of this information down to a secure location on your computer so you have it!
#3 – A2 Optimized Installation Details from ‘Softaculous' – This contains the login URL for you to access your WordPress dashboard. Simply look for the ‘Control Panel URL:' link in the email and save that securely, too!
This is the most important one right now because you will log in and learn how to build your WordPress blog in the following steps.
And remember, you already created your password in the previous step, so open that email, and click the login url.
Inside this email you will see the rest of your login information, specifically the special URL you will visit to access your WordPress website and your hosting control panel.
Copy this URL down on your notepad that has your login information from the checkout step and save that file on your computer.
This login information is needs to remain a secret and you need to make sure you keep your password set as something very difficult to guess!
If someone guesses this information or learns what your login information is, they can log into your website and change the content or take over the website and promote things you don’t approve of.
As someone who has had their website hacked, please take this comment here seriously. Keep your password and login information safe and secure
If you registered a new domain with A2 hosting, you are complete with this step and you can move on to the next step.
If your domain name is hosted with another company, there is one additional step required.
You will need to log into the account where your domain is registered and ‘Point your DNS’ to your new server.
Your current domain name registration company should be able to support you in this process and if you search their help documents they will have a write up on how to do this.
You can also reach out to their support for help with the process!
Here is a link to the A2 Hosting document on their support page that explains the process from their end.
Once you point the DNS of your domain name to your server it can take about 2 hours – 1 day for the change to go live (sometimes it’s as quick as 30 minutes, it just depends)…
Once you see the default ‘Hello World’ post displaying at your domain, your WordPress website is setup and you are ready to move on to the next step!
Woohoo and congratulations! You made it through some of the most technical aspects of getting your blog started…
Now let's really get things rolling!

How To Choose The Theme For Your Spiritual Blog
Okay, now we're going to choose the Theme, otherwise known as the basic design and look of your site.
One of the main advantages of WordPress is that the entire system is theme driven. A theme is essentially a look or design for a website that is easy for you to update or change as you want.
Since WordPress is open source, developers from all around the world are able to develop different themes that offer different styles, looks and functionality.
I’m going to share with you three options for themes, and once you install your theme you’ll be ready to begin populating your blog with content!
There are a few things to keep in mind before you jump in and choose your theme…
1.Themes Are Changeable!
The first thing to keep in mind is that you can always change the look of your site by changing themes in the future!
By following the same exact steps here with a different theme, in just a few clicks your website can have a totally new look. The theme is just the framework for your site, and it’s really your content and pictures that will make your site unique, so don’t stress over choosing your theme.
2. Quickly Choose A Theme and Get Started!
It is important to quickly choose a theme, and get version 1.0 of your web site’s ‘look’ dialed in fast so you can move on to publishing to your blog.
Ultimately, the content you publish is much more important than the look of your site!
(Many people make the mistake of getting stuck choosing a theme in an attempt to make the “prettiest” or “sleekest” website.) Don’t make this same mistake! You will be far better off choosing a theme quickly so you can move on and get started writing and publishing content to your site!
You can always loop back around and change themes or work on the brand and design of your site more in the future once you have the core content written.
3. Free Themes and Paid Themes
The third thing you need to know before you choose a theme is that there are free themes and paid themes to choose from…
I personally started on a free theme, but then migrated to a paid theme within a couple months because the developer of the free theme was not updating the theme I liked.
Themes need to be updated with security updates as WordPress gets updated. Some free themes have developers who are dedicated enough to keep up with all the updates, but I have found two paid themes that have developers who are very attentive to keeping their themes up to date, so I can highly recommend them.
Finally, keep in mind that the way a theme is presented when you’re looking at demo’s and “theme shopping” will look very different than when you install the theme to your website. This is because your website has little to no content and a website without content simply looks odd.
Know that you will get the look and feel of your site dialed in, over time… Especially once you start adding your core content pages, your first posts, and once you configure the theme options the way you want and add some images.
Ok, with that said, let's jump in.
Free WordPress Themes
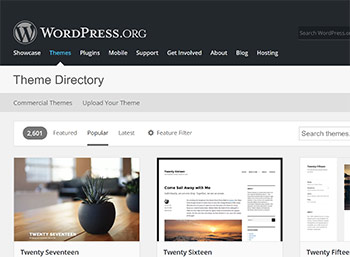
To find the free themes you have available to you, you can simply go to the WordPress theme repository here.
When looking at free themes, be sure you choose a theme that has been updated within the last 6 months at minimum. If the theme developer has not updated the theme within the past year, the odds of the theme missing an important security feature or update is high.
Elegant Themes

A theme family is one company that develops many different themes and keeps them all updated and offers you support if you ever have challenges installing them, updating them or if you want help customizing them.
I ran an Elegant Theme called ‘Glow Theme’ for several years and this WordPress theme is what I upgraded to after getting started on a free theme.
I recommend you take a moment to browse their different themes by clicking here.
Instantly you will notice that their themes are both sleek and beautiful, and they are also very easy to learn and use.
Thrive Themes
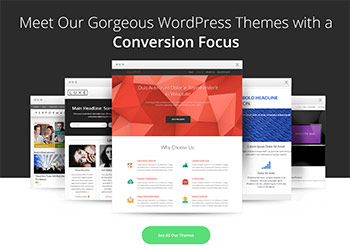
First, Thrive loads faster that just about any other theme out there… Google likes websites that load fast, and the theme files can be the difference between a fast and slow website.
Second, Thrive offers the ability to add on email opt in pop-up boxes and other features that help me grow my email list. They call it a ‘conversion focused theme’ and my email list is growing much more quickly since I’ve been utilizing these features.
Third, Thrive has an ‘Apprentice’ feature that helps me lay out my courses in a manner that makes going through the courses fun and easy for users….
One thing to keep in mind is that I’ve had my Thrive theme customized by a professional developer too.
So, if you go with Thrive Themes your site won’t look like mine by default, but there is the potential to customize it as you desire. Really, every WordPress theme is highly customizable by a professional developer if there are specific customizations you want to see.
My reasons for moving from Elegant Themes to Thrive Themes are quite advanced, but you may be interested in learning and building your site on the most versatile and powerful platform from the beginning… So I wanted to share that option with you.
You can see the different ‘Child Themes’ of Thrive here.
Final Thoughts On Choosing A Theme
Many people get ‘stuck’ at this phase because they try to find the ‘perfect’ theme… When really, there is no perfect theme!
Designing, developing and growing your spiritual blog is an evolution…
The look and feel of your blog will continue to evolve over time so for now, choose the theme you like and get started adding content!
Once you have your core content and first blog posts up, then circle back to the theme’s website and look at how the developers have it setup in the test site so you can begin to mimic the design elements they have featured on your site.
If you are on a tight budget, stick with a free theme to get started and be sure to choose one that has been updated recently by the developer!
If you want the most flexibility to easily change the look and design of your site, go with Elegant Themes and choose one of their themes you like… The different Elegant Themes all work and function in a very similar way so switching between different Elegant Themes will be easy in the future!
If you want to have the most professional level tools at your disposal from day 1, go with Thrive Themes as it is by far the most advanced and powerful theme for professional bloggers.


FREE Book Reveals How to Unlock The Healing Power Of Angels Now!
Click The Button Below & Get Energy Healing With Your Angels FREE!
Click HereInstalling Your WordPress Theme
Once you choose your theme and complete the purchase process for a theme family if needed…
You will be able to download the theme files to your computer.
The theme files are in a .zip folder and once you download that to your computer, log into your WordPress dashboard with the login information that you received from A2 Hosting in the email.
For Video Instructions on How to Install Your Theme, click the following links:
The basic process is this: From your WordPress dashboard, you will click on the ‘Appearance’ tab on the left side and then click ‘Themes’
From here click ‘Add New’
Choose the theme’s .zip file that you downloaded and click upload.
On this final screen, click the ‘Activate’ button and you have successfully installed your theme on your website.
One thing to remember…. If you visit your site and look at how this theme looks, the site will not look great because there is no content yet!
I’ll show you how to add your core content here in the later sections of this post and as your site grows with content it will look better and better…
Looking at a website with no content is like walking through an empty house, compared to a house that is full of beautiful furniture with artwork on the walls.
You have just built an empty house on a very stable foundation… We will get the furnishings and artwork dialed together in the next sections…
Give yourself a high five if you’ve been following along with these steps, because you now have a spiritual blog!
Now we’re going to look at how to actually fill your site up with the most important part… Content!
Be patient with yourself and trust in the process as we now continue to build your Spiritual Blog!

Creating Content on Your Spiritual Blog
The Difference Between Posts and Pages
Before we talk a bit about actually writing your blog, let’s take a quick look at where and how you will actually publish your content.
There are two main content types you will use to build out your spiritual blog Spiritual Blog on WordPress… They’re called posts and pages.
WordPress Posts
Posts are what you will use for your actual blog posts, and if you are using your WordPress site as a Spiritual Blog, most of your content will be in this post format.
Posts are displayed in a reverse chronological order on your blog home page (or you can designate for them to show on another specific page). This allows for an easy organization of your content, and you can even further organize posts based on tags and categories.
Posts also have a built-in commenting feature so your readers can engage with what you write. You can however, turn off commenting under Settings -> Discussion if you want to, however I don't recommend doing that.
Posts by default will be added to an “Uncategorized” Category. I recommend making a new category for your blog and assigning all your posts there.
You can slo have multiple categories, like on this site I have a category for my blog, a category for free angel messages, and a category for paid messages.
WordPress Pages
Pages are essentially the static, framework content for your site. These aren’t blog posts, but rather are foundational content.
Pages are typically displayed on the top navigation, you may want to include the following:
An About Page where people can learn who you are and what you do.
A Contact Us Page
A Blog Page where your blog posts and categories will display (this is your homepage by default in WordPress)
Once you get your blog going and over time you can add pages to display the products, courses, sessions, readings or services you offer.
For example, I have an Angel Courses page on my site that lists all the courses available for sale.
Start Writing!
We’ve covered a lot here already… And if you've followed the guidance in this post so far, your blog should be up running!
There are a few more technical things to cover that we'll get to shortly, but honestly, at this point, you have everything you need to start writing.
This is powerful to do because of course, the key to a successful spiritual blog is writing!
I recommend taking some time to brainstorm topics you’d like to write about. These can be things you’re an expert on, interested in, or just wanting to research.
You don’t even have to be a spiritual expert to run a highly successful spiritual blog, so don’t let this hold you back! Organizing ideas, sharing what you’re learning, and curating content can be an incredible service, so if that’s where you, start there!
Write down a list of potential topics for your blog. When you’re first starting out, it is a good idea to focus a bit. What is the overall topic of your blog?
What I mean here is that you’re more likely to attract a dedicated readership if all of your content serves that specific audience.
For example, starting out I published channeled angel messages and articles about angels. Had I thrown in some random articles about makeup reviews, or the best action movies it would likely just confuse my readers, and make it more difficult for Google to determine what this site is about.
I hope that makes sense. Essentially, if you want to write a spiritual blog, share articles on spirituality. If you want to start a food blog, really focus in on that!
So… What do you want to write about?
Come up with a list of topics you can write about and then… Get writing!

A Simple Guide to How to Write A Good Blog Post

I recommend writing in a conversational manner as if you’re talking to one person.
So instead of writing something like:
“How is everyone on there on the internet doing today? Have you all been feeling the energetic shifts lately?”
I recommend “How are you today? Have you been feeling the energetic shifts lately?”
See the difference?
In addition to writing directly to one reader, because ultimately only one person will ever be reading your blog post at a time (at least from their perspective), write as if you’re telling a story.
Include an introduction, the main points of your article, and a conclusion.
There’s no perfect length for a blog post, but somewhere between 1000-2000 words is typically recommended to get in good with the search engines. Really, you’ll end up having some posts that are shorter, some that are longer, and maybe even some that are waaaaay longer (like this post here).

A Little Trick For Editing Your Writing
One thing I’ve learned in my years of blogging is that readers love, or rather hate grammatical errors and are quick to point them out in the comments, which honestly can be helpful in finding them, but ultimately reducing your spelling and grammar errors is key for coming across clearly and professionally.
My first tip for you on this is to re-read your posts before you publish them! This simple step will make a big difference.
I still make errors for sure, but another thing that has helped a great deal is a service called Grammarly. I use their free version.
They have a paid version, but I just use their free version.
Grammarly is essentially an extension for your web browser, that is like having a live grammar and spell check angel sitting over your left shoulder. They helpfully, and non-intrusively point out errors so you can easily fix them.

The Low Down On Pictures and Images

This, of course, includes photos you take yourself, however, there are other options for finding imagery too.
I do want to make this clear though, if you just search Google for pictures to use, you’ll likely be in violation of copyright law.
Sites like Pixabay.com or Freeimages.com or Wikipedia Commons are good places to find free royalty free images to use.
And then there are paid royalty free images you can purchase from sites like Bigstockphoto.com or Shutterstock.com, or iStock.com.
When you're adding pictures to your site, it's really important that you first resize them and optimize for the web. Without taking this step (or resizing within WordPress) can significantly slow your sites load speed.
I use Adobe Photoshop to do this, but Photoshop definitely has a learning curve, and there are many other options like Canva, PicMonkey, and more!
If you're already proficient in a photo editing program… Use that to resize your images!

Share the Love!
After you’ve started writing for your spiritual blog, the next step is to share your posts!
It will take time for Google to index your site, and there are many more factors that go into ranking on Google which we can talk more about… Honestly, the best thing you can do is to commit to a consistent publishing schedule and stick to it! From there, your web traffic will grow over time.
When you do post, sharing to social media sites like Facebook, Pinterest, or Twitter can be a great way to get the ball rolling.
You can also add Social Sharing plugins to your site to make it easy for your readers to click and share your posts.

The Pure Magic of Plugins
Wait plugins? … Magic? Yes!
Plugins are a really cool component of WordPress that allows you to easily add cool functionality to your site.
There are literally thousands of both free and paid Plugins you can to your site to add functionality like photo galleries, security, social sharing, related posts, search engine optimization and more.
That being said, it's wise to use plugins sparingly, as too many plugins can cause your load time to lag.
Also, free plugins that are not regularly updated may be missing key security patches and can cause vulnerabilities in your site.
The WordPress plugin directory shows ratings on plugins, and its best to use highly rated and recently updated plugins on your site.

Don't Forget to Update Your Site!
I mentioned above that WordPress is open source, and that there is a passionate group of developers who are consistently working to make it even more awesome. Every time WordPress, your Theme, or individual plugins are improved, these improvements are rolled out in what are called updates.
In addition to keeping things up to date to access new functionality and improvements updating is essential for security too!
With every new update, in addition to new or enhanced features and improved performance, there are also bugs that are fixed and security patches added. So updating is key to staying up to date in these areas.
Another way of looking at this is that when you don't update your plugins, Theme or WordPress installation (when new versions come out) you're not only missing out on improvements, but you're leaving holes in your security.
Not keeping my plugins up to date is likely how my site got hacked back in the day, which has been completely resolved and healed at this point, was definitely stressful when it happened.
Moral of the story… Stay on top of your updates!

Using Widgets to Manage Your Sidebar and Footer
Another area of your site you have the ability to customize is the sidebar and footer… You do this using widgets!
WordPress Widgets are essentially blocks of functionality. They make it easy to add functionality in widget-ready areas of your site (like the sidebar and footer).
Access the Wigetized areas of your site (like your sidebar and footer) under Appearance > Widgets
Where you have widgetized areas varies from theme to theme, so if you go with a theme other than Elegant Themes or Thrive, and you do not see Widgets… That means your theme doesn't support them.
By default, WordPress comes installed with Widgets to choose from including a tag cloud, text box, navigation, calendar, search, recent posts and more.
Inside of the Widget area of your WordPress dashboard you can drag and drop widgets into your sidebar (or wherever else you have a widgetized area).

Start Making Money with Your Spiritual Blog
The key to making money with your Spiritual Blog is to consistently publish amazing content for free. This builds your audience and the number of readers you have.
Once you have readers though, there are many ways in which you can make money with your blog.
I've covered the top 11 ways spiritual bloggers make money for you in an article here:
11 Ways Spiritual Bloggers Make Money

The “Keys” to the Spiritual Blogging “Kingdom”
The keys to the kingdom when it comes to creating a successful spiritual blog is consistency! Consistently publish new quality content, and over time you will attract readers.
Trust me, I get it… When you're first starting out, you may feel like no one is reading your posts.
This is normal! … Keep going.
It can take months before you really start gaining traction and attracting readers. I'll share more about how you can get the word out about your blog in another post…
All marketing aside, the key here is to really focus on being of service and to consistently publish quality heartfelt articles and blog posts. You'll learn, grow and get better as you go… And if you stick with it, you can not only build an incredible resource of love, light, and positivity for the world… But you can also craft out a unique little side business, or even full-time income for yourself in this way.
It takes both quality and consistency.
I recommend committing to a publishing schedule (publishing quality posts as often as possible) and then sticking to it!
One of the best things I ever did to grow my blog to the next level was a 30-day blogging challenge. Every day for an entire month, I would write and publish a new, high-quality article to my spiritual blog.
Yes this was a huge amount of effort, yes there were days I really didn't feel like writing, or when something came up that was more urgent… But I pushed through, put in the long hours and did it, and the growth of my blog reached an entirely new level… And now that I continue to regularly post, it just continues to grow.
If I can do this… You can do it too! It just takes starting, and then continuing!
And now… You now have everything you need to start your Spiritual Blog…
I hope this has been helpful for you!
Be sure to comment below and let me know if you have any questions, if you'd like to see me write more about spiritual blogging, or if this has been helpful for you. I love hearing from you!
I always love hearing from you and appreciate your comments!
With gratitude,


Get A FREE Angel Message Now And Tap Into The Healing Power Of Angels!
Click The Button Below For Free Instant Access!
Click Here

